INSTALLATION and ADJUSTMENT INSTRUCTIONS
Congratulations on your purchase of the Smart ValveTM. You are about to start saving! Installation should only be done by a licensed plumber or Mechanical Engineer.

FLANGED SMART VALVE
1. Identify installation location and prepare pipe for installation on the user side of the water meter. Install location should be before any other fixtures or devices such as a pressure reducer or booster pump. Immediately after the backflow preventer is often a good place.
2. It is recommended wherever possible (but not critical) to have 10 diameters of straight pipe before and after the valve to ensure there are no turbulence issues. I.e.: 2” valve x 10 dia. = 20” before and after. If you must choose, leave more straight pipe before the valve.
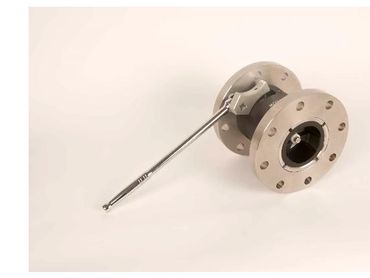
3. Prepare pipe flange spacing to allow for length of valve and gaskets to be installing inline. Valve length varies by size, please see Cut Sheets for exact dimensions.
4. Install using flange gaskets (usually 150 pound gasket) at each flange joint.
5. Make sure the closed orifice end faces upstream and the open orifice end faces downstream. See flow direction arrow on the valve.
6. Slowly turn water supply back on. Vent trapped air from the water line where possible. Flow may be turbulent until excess air is out of the system
ADJUSTMENT INSTRUCTIONS
The Smart Valve is an EXTERNALLY ADJUSTABLE device, allowing you to fine tune the spring setting for maximum savings without any negative effects, and to allow you to adjust to any future changes in your water system pressure or flow rate.
Installing a pressure gauge (temporary or permanent) at least a few feet downstream of the Smart Valve will greatly assist in calibrating the valve with your water system, but is not mandatory.
Your goal is to adjust the Smart Valve to the strongest setting tolerable to the system without causing problems or complaints due to too large of a pressure drop. The stronger the setting the more you will save in meter accuracy and water over-consumption.
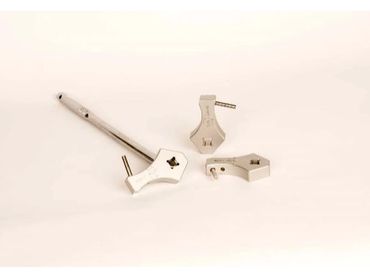
Once the valve has been properly installed, locate the ‘adjustment windows’ near the center of the valve. Inside are numerous slots designed to fit the adjustment tool. Attach the tool to a 1/2" head ratchet handle. You will insert the adjustment tool pin into one of the slots and rotate the inner collar in either the PLUS (+) or MINUS (-) direction as marked on the valve.
The Smart Valve is delivered to you near the full MINUS setting where there should be little to no effect from the valve. Insert the pin into a slot in the window and rotate the inner collar towards the PLUS side. Each full length of window adjustment is a ‘click’.
Each click towards the PLUS side will further increase the backpressure upstream towards the water meter, and should result in a corresponding pressure drop of 1-2 PSI downstream of the valve. There are approximately 22-23 clicks between full MINUS and full PLUS.
If an adjustment needs to be made after the Smart Valve has been in operation for some time, you might experience ‘sticktion’, where it seems the inner collar is ‘stuck’ and the first adjustment will be more difficult. Once you break the ‘sticktion’ with a little extra force the valve will be easier to adjust.
2” Smart Valve Cut Sheet
Materials
Acetron GP
Stainless Steel
FDA approved internal o-rings
Certifications
NSF 61 (potable water)
NSF 372 (lead free)
Certifying laboratory: IAPMO R&T
Installation Dimensions
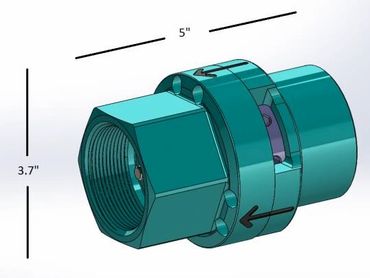
2” SMART VALVE:
Body Length 5”
Body O.D. 3.7”
Thread Female NPT
Thread depth 1”
For best results install the Smart Valve downstream of water meter and backflow preventer (if present), but before any other valves or equipment such as a pressure reducer or booster pump. Where possible it is recommended to have 10 diameters of straight pipe before and after the valve. All threaded installations to use pipe tape and pipe dope. Do not over tighten.
3” Smart Valve Cut Sheet
Materials
Acetron GP
Stainless Steel
Aluminum (flange support – no water or pipe contact)
FDA approved internal o-rings

Certifications
NSF 61 (potable water)
NSF 372 (lead free)
Certifying laboratory: IAPMO R&T
Installation Dimensions
3” SMART VALVE:
Body Length – Flange to Flange 6.45”
Approximate Weight 19 lbs
Bolt Pattern Standard
Bolt Holes Through Holes
Shipping Weight 21 lbs
For best results install the Smart Valve downstream of water meter and backflow preventer (if present), but before any other valves or equipment such as a pressure reducer or booster pump. Where possible it is recommended (but not critical) to have 10 diameters of straight pipe before and after the valve. All flanged installations to use gaskets at each flange.
IMPORTANT: If the pipe the Smart Valve is being installed in is used as a Ground Fault Line, The Smart Valve will NOT conduct a current through the pipe without a grounding strap. As a precaution, ALWAYS use a ground strap across the valve from pipe to pipe.
4” Smart Valve Cut Sheet
Materials
Acetron GP
Stainless Steel
Aluminum (flange support – no water or pipe contact)
FDA approved internal o-rings
Certifications
NSF 61 (potable water)
NSF 372 (lead free)
Certifying laboratory: IAPMO R&T
Installation Dimensions
4” SMART VALVE:
Body Length – Flange to Flange 6.45”
Approximate Weight 31 lbs
Bolt Pattern Standard
Bolt Holes Through Holes
Shipping Weight 33 lbs
For best results install the Smart Valve downstream of water meter and backflow preventer (if present), but before any other valves or equipment such as a pressure reducer or booster pump. Where possible it is recommended (but not critical) to have 10 diameters of straight pipe before and after the valve. All flanged installations to use gaskets at each flange.
IMPORTANT: If the pipe the Smart Valve is being installed in is used as a Ground Fault Line, The Smart Valve will NOT conduct a current through the pipe without a grounding strap. As a precaution, ALWAYS use a ground strap across the valve from pipe to pipe.
©2022 Flo-Gistics LLC - Phone 201-588-0643 - PO BOX 1011, Island Heights, NJ 08732
E-mail flo-gistics@outlook.com
This website uses cookies.
We use cookies to analyze website traffic and optimize your website experience. By accepting our use of cookies, your data will be aggregated with all other user data.